My Setup of Security Onion on the Antsle:


Recently my IDS box, an Intel Atom D2500 Fanless Mini-ITX PC, D2500CCE, died.


Truth be told, I think it came from the factory in a bad state, as I originally thought I had a bad graphics driver, but I then noticed that, after much troubleshooting, it wasn't a driver issue at all. The box just sometimes wouldn't boot up correctly with video. It seems heat related, something like not enough thermal paste on the CPU, as after it is powered off for a while it is more likely to boot than when it is warm. Along with that issue, this box maxed out at 4GB of RAM (only has 2 memory slots, each of which will only take a 2GB card max) and had a single processor, so it was under powered for Security Onion.
So, I decided to quit limping along on P.O.S. boxes, and buy a little more heavyweight box for my networked IDS. Security Onion requires a minimum of 8GB of RAM, and 4 cores per their specs page https://github.com/security-onion-solutions/security-onion/wiki/Hardware. Sure, I could get a full-blown PC, but that is loud, takes up space and power, and usually has things I don't need (like an expensive graphics card). I really wanted a lightweight, fanless PC, with multiple NICs and that could run all of Security Onion's applications (Kibana, Squert, Sguil, Bro, etc).
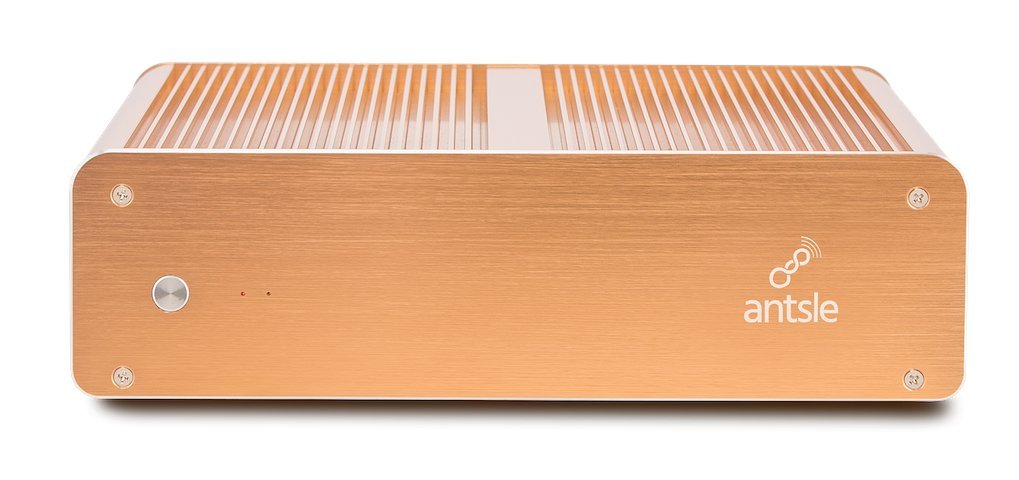
Enter the Antsle. After much searching for a fanless PC for my NIDS, a friend recommended the Antsle. He said that he had heard good things about it, especially that their customer support was very good. I did some checking, and the Antsle seemed to be just what I was looking for. Here's what the one I bought looks like:
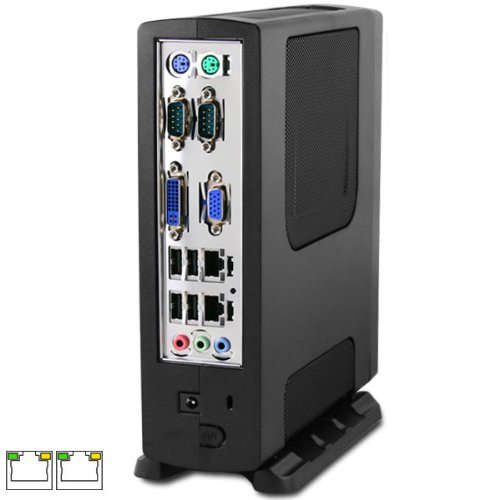
and here is the back (couldn't find a gold back photo):
It has four NICs, VGA video (Perfect, as I run it headless), 8GB ECC RAM, 2x 250GB HDs (in a mirrored RAID for redundancy, so that is really only 250GB of storage), and 4 cores. It $830 dollars total ($800 plus $30 shipping), but I had been limping along on crappy hardware for my IDS for about 10 years, and I already have Xen and VMWare servers, and I wanted to try out Antsle virtualization, so I justified the purchase.
When I got my Antsle, I originally made a n00b mistake and put it on my network with the same IP as another box. I have tons of machines, and didn't have my documentation handy, so I picked an IP by sending a ping, and when I got no response I called it good. Oops. So I had some self-initiated issues setting it up, as sometimes my browser would talk to it, and sometimes it wouldn't. I THOUGHT it may be my setup, so I emailed their customer support. They were very gracious in helping me troubleshoot my self-initiated problem. After I found out that my problem was my static (duplicate) IP address, I felt pretty stupid. I also contacted them when I didn't know that they put the hard drives in a mirrored RAID, and I was wondering why I only saw 250GB of space. Again they were friendly, knowledgeable, and courteous.
OK, so next came the install of Security Onion as an Antlet. I manage my IDS on a separate network from the one it sniffs, and from where I manage the Antsle host. Thus my setup is that br0 is the NIC I manage my Antsle on, br1 is the NIC that I sniff from, and br2 is the NIC that I manage my Security Onion on. I am unsure why Antsle exposes bridges as their NICs, but that is how they roll. Here are how they are configured (br0-br3):
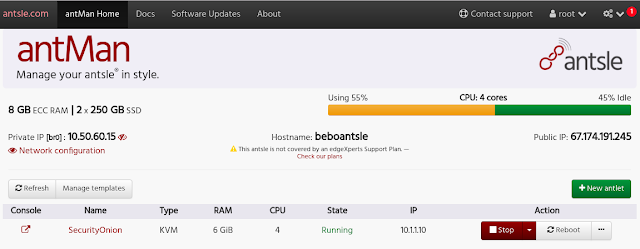
Let's walk through the installation of Security Onion on the Antsle. Here is the antsle main page with no antlets:

After you select 'New antlet' pick 'Blank-KVM' for your template. Originally I gave my IDS only 6GB of RAM, and this seemed to work fine. I bumped it up to 8GB later and both setups seemed to work about the same.

After you select 'Create antlet' and your antlet is made, in order to configure it to boot from the Security Onion iso, click on the antlet, select the Virtual Drives tab, and Import Disk.

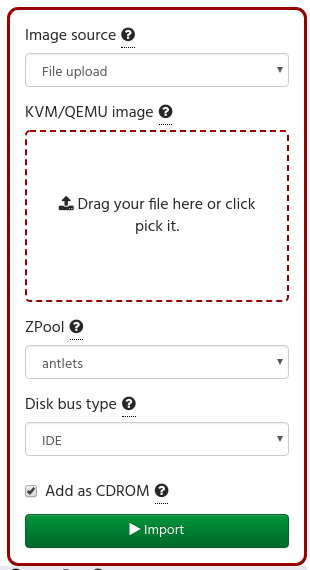
You then find your securityonion-16.04.5.1.iso, drag it to the box, check the Add as CDROM, and upload (Import) it. That will allow your Security Onion to boot from the iso when it is powered on. When you are done, it will look like this:

Next is setting up the NICs. I use br1 for my sniffing interface, and br2 plugged into another subnet to manage my IDS. Before you can add NICs to your antlet, you need to activate them and configure them in the antMan management page.

Since you have to give your NIC either a DHCP or static address, I picked a static IP of 0.0.0.0/24 on my sniffing interface, br1, which is plugged into a cisco spanning port to sniff my network.
I then selected a static IP on the IDS-management Lan, br2. This NIC, since it has an IP on the same LAN (192.168.6.x) as my Security Onion management NIC, will forward traffic to the 192.168.6.x IP of my antlet. A restart of the antsle is required.
I then selected a static IP on the IDS-management Lan, br2. This NIC, since it has an IP on the same LAN (192.168.6.x) as my Security Onion management NIC, will forward traffic to the 192.168.6.x IP of my antlet. A restart of the antsle is required.
On boot up, it will ask if you want to keep this configuration. Confirm it, or else after a while the antsle will revert to its old network configuration (I like that feature, as if you screw something up you just have to wait for your changes to revert).
I then went back into my Security Onion antlet configuration, and added my two NICs to it.

This is the end result

When you start your antlet and open the console, you'll be greeted with the Security Onion installation page:

Then, after Security Onion booted up, I installed like so:
- Install->English->Download Updates while installing->install 3rd party software->Erase disk and Install->Continue->Pick Timezone->English->Pick a name, password, login automatically, and don't encrypt home drive.
It will then take a long time copying files and installing. Restart when you are done. A small issue here is that it asks you to remove the installation media and press Enter. That is impossible, as you can't remove the virtual DVD drive while the antlet is running. I just hit enter after it looked like it was booting back up I Force Stopped the antlet in antMan, and went into the Security Onion antlet configuration and deleted the CD ROM iso, and started the antlet back up.
This worked for me, and when I booted back up and opened my console, my Security Onion antlet was all installed. Next was to configure it.

I clicked on the Setup icon on the desktop and was greeted with this:

I was met with this choice:

ens3 is the same as br0 on the antsle, so I don't want to use that. I sniff on ens5, which is the same as br1, so I don't want to use that. I manage on br2, which is ens8. So I selected ens8 for management.
I made the NIC static, gave it an IP address on my management LAN, a subnet mask, a gateway, and DNS servers.
It asked for a domain, and I just made one up (I wrote it down in case I needed it, but didn't)
Next was configuring a sniffing interface:

I selected only ens5 for sniffing:

I accepted these changes, and rebooted. Since I selected to automatically log in, it was back to the desktop. I clicked the setup icon again to finish my configuration. I selected to Continue, and this time I skipped the network configuration.

I got this warning about RAM when I selected 6GB. But I pressed on anyway.

I selected 'Yes, Continue.'
Since I was using a single VM, I selected 'Evaluation Mode'

I told it to monitor ens5 (again), gave it a user account, a password, and proceeded with the changes. This again took a little while....
Then my setup was complete!
***********Alternate Install Method*******
Update: Later, after using Security Onion for a while, I decided that I didn't really use Bro, Kibhana, nor the Elastic Stack, and since they utilized a lot of resources, another installation method that worked well with me was to select "Production Mode" and when it asked for the services to install:
I disabled Kibhana,
I disabled Bro,
and I disabled the Elastic Stack.
I also said not to keep pcap files, and this decreased my Antsle resources to about 40%! That seems like it may be the way to go! But, I'll continue with my old blog below
********************************************************************************************************************************


This last one is important to me. I need to manage my IDS on a separate network, and while I can 'ssh -X' to my IDS and then 'sguil.tk' to pipe the sguil X11 GUI back to myself, I can't get Kibana nor Squert to work that way. In the old days you could 'ssh -L 8080:localhost:443 user@IDS_IP' and bring up a browser through that pipe locally, but that seems locked down now, especially as it's a VM that also has to go through a bridge. So I chose to simply so-allow my analyst box later on to get to these GUIs through a simple browser query.
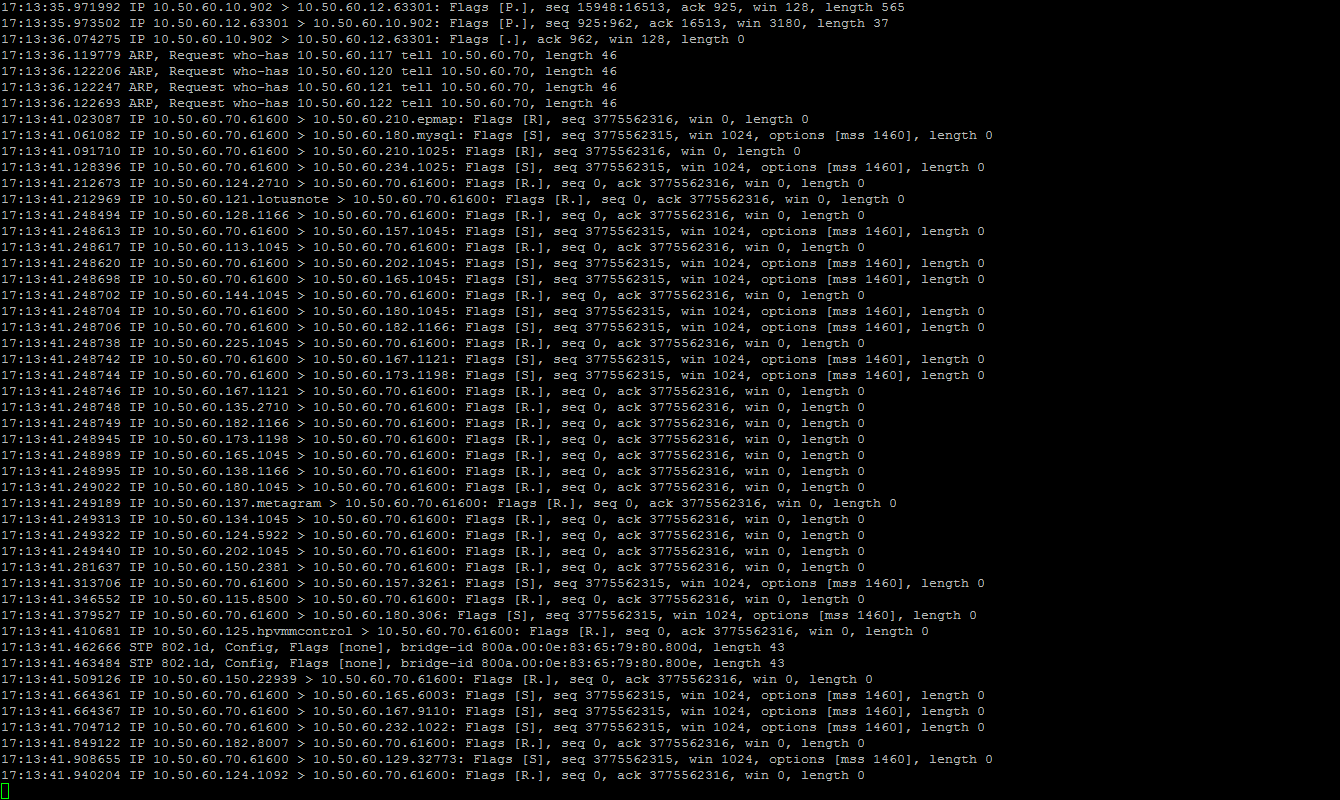
OK, so one problem noted was that when I did a tcpdump on my Security Onion sniffing interface, I only had layer 2 traffic (ARPs, STP, DHCP, etc). This was a problem. My NIC was off of a spanning port of a Cisco switch, so it should see more than just layer two traffic.

I troubleshot this for days, and even contacted Antsle Customer Support again, but although they tried valiantly to help me, always promptly responding to emails, I got nowhere.
I got my friend, Matt, to look into the matter, and he compiled tcpdump on the Antsle (not installing it on the OS, but just compiling it so it would run in a folder). He did this by:
making a directory, cd into that directory, downloading tcpdump-4.9.2.tar.gz & libpcap-1.9.0.tar.gz and extracting them. cd'ing to libpcap && ./configure && make. Then cd'ing into tcpdump-4.9 && ./configure && make.
When tcpdump was ran against br1, it was clear that both layer 2 and layer 3 traffic was hitting the NIC.
So if the traffic was hitting br1, why wasn't Security Onion seeing it?
Here is what the bridge looks like:
Here is what the bridge looks like:

When I examined the bridge, it looked like br1 was the bridge to the real NIC, enp0s20f1. Both of these NICs passed layer 2 and layer 3 traffic. However, the logical NIC, vnet1, which was part of this bridge and was tied to my Security Onion antlet, only passed layer 2 traffic. So I started searching for a way to forward all traffic through the bridge to vnet1.
The solution was this 'brctl setageing br1 0' After I ran this command on the antsle, all my traffic flowed through vnet1, and also on ens5 on my Security Onion antlet! This one command took me days to figure out!
And after I mentioned the above command, the totally AWESOME Tech Support folks at Antsle out of the blue sent me this:
John,
Fyi, In case you didn't figure this out as well. You can make the ageing time persistent by adding the following line to the 'net' configuration file in the antsleOS
bridge_ageing_time_br1="0"
Open the 'net' file for editing
nano /etc/conf.d/net
In this example I am setting the ageing time on br1
bridge_br1="enp0s20f1"

config_enp0s20f1="null"
config_br1="192.168.1.44 netmask 255.255.255.0"

rc_net_br1_need="net.enp0s20f1"

bridge_ageing_time_br1="0"
Save and exit.I was actually wondering how to make my bridge ageing persistent, and without even asking them the Antsle Customer Service guys told me! Seriously, Antsle Customer Service is the best I've ever seen for anything.... EVER!
I rebooted to test this out, and this worked like a champ. My IDS now always gets all the bridge traffic.
Next was to try it out. As I mentioned, if I wanted to just run sguil, I could
ssh -X to my IDS box and run sguil.tk, and the sguil window would pop up locally, but i wanted Kibana and Squert as well. Therefore, I had to
so-allow, select analyst, and give it the IP of the box I use to administer it with.
I was then allowed to log into to my Security Onion Antlet with a browser to my Security Onion management IP:

.
Here's a screenshot of Security Onion catching me scanning my network

Here is another Security Onion view:

for sguil, I still use
ssh -X user@IDSIP
sguil.tk
Then I'm presented with an X login screen

And after logging in, the glorious sguil screen of alerts:

Summary:
It seems that for me, Security Onion works flawlessly on the Antsle as an antlet. I am super happy that I bought the Antsle for my IDS hardware.
For reference, my one Security Onion antlet usually has my CPU at around 40-80% all the time (in both the 6GB and 8GB configurations). I couldn't really tell a difference from when I gave the antlet 6GB of RAM vs 8GB of RAM, with the possible exception that the applications like Kibana seemed to respond a little faster. Sometimes I've seen the CPU up at 99%, which makes me a little worried. But I haven't had any issues like kernel panics or poweroffs or even slow downs. I have 250GB of space, 100GB of which I allocated to the Security Onion hard drive, and have been running it for a week, and have only used 13% of that space.
I now get to see all my network alerts and catch those hackers! ;)
That is how I set up Security Onion on the Antsle. I hope these instructions help someone out.
Thanks again rocking Antsle Customer Service folks!
It seems that for me, Security Onion works flawlessly on the Antsle as an antlet. I am super happy that I bought the Antsle for my IDS hardware.
For reference, my one Security Onion antlet usually has my CPU at around 40-80% all the time (in both the 6GB and 8GB configurations). I couldn't really tell a difference from when I gave the antlet 6GB of RAM vs 8GB of RAM, with the possible exception that the applications like Kibana seemed to respond a little faster. Sometimes I've seen the CPU up at 99%, which makes me a little worried. But I haven't had any issues like kernel panics or poweroffs or even slow downs. I have 250GB of space, 100GB of which I allocated to the Security Onion hard drive, and have been running it for a week, and have only used 13% of that space.

I now get to see all my network alerts and catch those hackers! ;)
That is how I set up Security Onion on the Antsle. I hope these instructions help someone out.
Thanks again rocking Antsle Customer Service folks!
Comments
Post a Comment